Why create an animated png over a gif?
The gif format has many uses and is still widely used but it does have some limitations. The apng or animated png format improves on those areas, offering smaller file sizes, better colour depth, 24-bit transparency and support from all modern browsers with a static first frame fallback for those that don’t support it. You can see a list of browsers that support apng here.
Apart from file size, the main reason you would likely be forced to use apng is because of the jagged edges a transparent gif produces, in most cases these are unusable. These are a limitation in the gif format but apng offers much improved quality for transparency.
How to make apng files with transparent backgrounds
You can create your apng animation in Photoshop using the animation panel as you would a gif, but you will notice there is no option for apng export (this is available in Adobe Animate for those who use it). So instead we need to export the frames individually.
Export animation frames with Photoshop
To do this, go to file > export > render video and choose ‘image sequence’ and set the alpha channel to ’Straight Unmatted’. Then you need to select your frame rate, you may need to tweak this to export the desired amount of frames. Before rendering the files be sure to create a folder to save them in to because there will be a lot of files.

Export animation frames with After Effects
In After Effects you can add your animation to the render queue as normal and under the output module settings you can select ‘png sequence’. Then select ‘RGB + Alpha’ under the channels menu.
Turning an image sequence in to an apng (animated png)
Then to create an animated png (apng) file from the image sequence I used the ezgif free online tool but other options are available. I liked the ezgif tool because it offers features like retiming delay on the frames, selecting the loop count, crossfading frames and even stacking them.

Should I use apng instead of gif?
There is definitely not a one case fits all for these two formats but for interactive web elements I would certainly say that going forward, apng will be my format of choice. The saving on file size have a positive impact on page load, the broader colour depth is perfect for anything involving photos and the cleaner edges for transparency are a game changer for how I work with animated images.
The workflow is a bit more fiddly at the moment but it won’t be long until export tools are made available in other programs and the extra effort is really noticeable and worthwhile in the final output (no so much in this example). So in short I would say if you want transparency layers, smaller file size and a broader colour palette I would recommend you create an animated png over a gif file. Remember to always be careful with file sizes for anything being delivered online, use them sparingly as overuse will create long load times.
Supporting all browsers
If you want to support all browsers with something like this, then you need to consider using the WebP format, then falling back to APNG for Safari/iOS users and finally having a static image fallback for browsers like Internet Explorer. This will require you to use the picture tag to serve up multiple images formats. This is a lot more overhead but you will make a huge file size saving using WebP on those browsers that support it, so it is worth considering. You can make WebP images in the same online tool here so it is worth seeing the different between the two. You can see the browser support for WebP here.
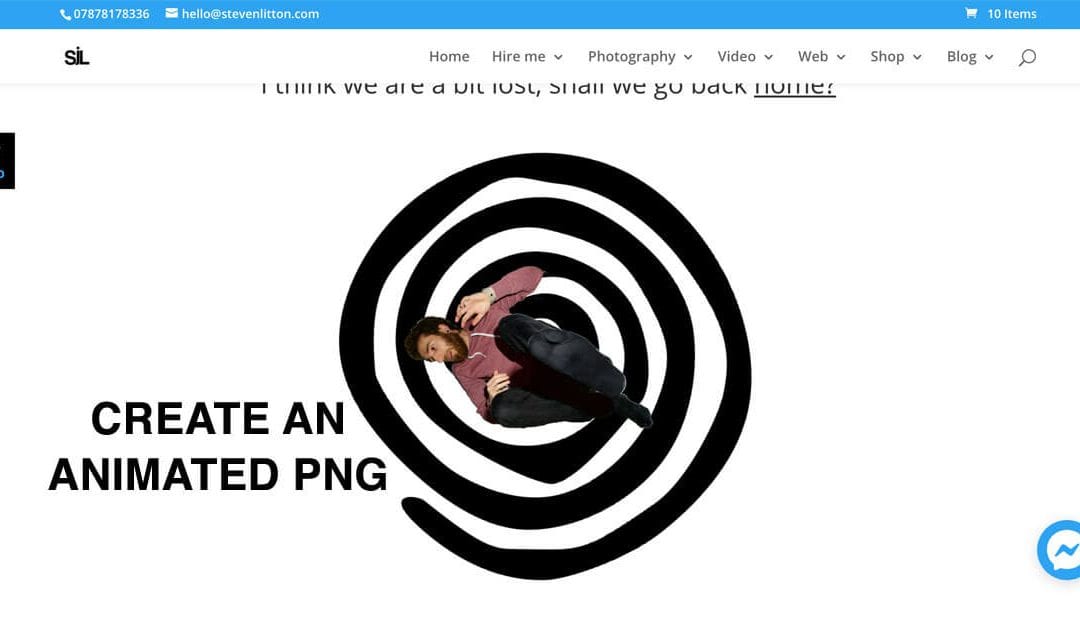
My Example Animated PNG
Below is what my test animated png looked like, ironically the preview is a gif. A monstrosity I know and not the cleanest background removal but it was a fun test to play around with the animated png format. The frame rates for animated pngs can be a lot smoother than my example, it was just a quick test consisting of 5 frames. I combined CSS animations with my Animated png and that allowed me to separate the circle behind and animate the image on top independently. You can see the page it is being used on here.
 with Transparancy")
Found this content helpful?
If you found this content useful then please consider supporting me to write more tech support articles by buying me a coffee or donating through Paypal.


Hi Steve,
I am currently having trouble getting my APNG to work on my WordPress website, we have had to upload the file as a GIF but not the edges are all fussy and it just looks rubbish!
Any advice?
Thank you!
Hi Fran,
Sorry for the delayed response, APNG files don’t currently work across all browsers, so it may be that you are viewing it on an unsupported browser. You will need to use the picture tag with a static png fallback for browsers that don’t support them. There is slightly more support for WebP but you will still have to add a fallback. I hope that makes sense. In some cases, a CSS/Javascript animation may suffice depending on the complexity of the animation.
Thanks,
Steve
Hello Steve,
What if only have one png and all I want for it to do is to bounce up and down?
Hi Andrea,
If it is for email you would just need to animate the bounce movement and export it as an APNG or if it is for a website then you could just use the static PNG image and then animate it using CSS animations or Javascript.
Hope that helps.
Thanks,
Steve
I am rendering the Apng for ezgif but it does not render the transparent BG. Do you have any suggestions or I am making any falt.
You must make sure the image going into ezgif is being saved a png with transparency, if the image going in has a transparent background, it should just preserve that by default.
When I save your animated picture it says: “Create-an-Animated-PNG-APNG-with-Transparancy.gif.webp”.
Does this not mean your picture on the site is an animated .webp file?
That is because I was trying out a WebP conversion plugin and it didn’t even occur to me that it would affect this post.
The problem with WordPress free blogs is that they auto-covert the aPNG to a single static PNG, on upload. That is why Fran cannot get this type of PNG on her blog. This problem only affects the free blogs at WordPress.
Thanks for clarifying that, I don’t use that version of WordPress currently but that is useful to know.
In your 404 error page animation example the file size is a huge 3.5mb. How does the average person mitigate such a huge file size? It surprisingly loaded faster than I would have guessed.
It is a very large file (800px by 1200px), which is far too big for a web animation, it is also not masked or optimised particularly well. It was really just a bit of a test more than anything else. It loads fairly well though because it is served through lazy loading and I use Litespeed cache. Hope that helps.
Steve – Just wanted to say you are so great for posting about this. This was exactly what I needed to know and I very easily followed your suggestions and quickly created the APNG I needed… I’m so grateful we live in an age where we can search the internet and find articles like yours when wanting to learn something new. Thank you so much.
Thank you, glad you found the article useful. That is really nice of you to take the time to write that, makes it all worth doing!
Appreciate the tutorial Steve.
Do you know of a way to resize an existing APNG while retaining both the transparency and animation? I’ve tried a couple applications here and there (though not ezgif) and while I can successfully resize the APNG and retain the animation, the background transparency is lost in the process (Specifically I’m attempting to use VirtualDub APNG Mod)>
Just thought you might have some ideas since you’ve worked in this format a bit. I’m starting to think I’m going to have to extract the frames from the PNG, resize each individually to retain their transparency, and then recombine in ezgif. I’d *really* rather not have to do that, as there are at least 40 of these things I need to process.
Cheers.
Thank you, glad you found it useful. Yes, I think ideally you would do it at source and just automate the resizing of the original images in Photoshop or similar. This can be a simple Photoshop action and so long as they are sequential something like EZgif will just put them in the right order. But if that is not an option, you can use this page on EZgif https://ezgif.com/apng-maker and if you upload an APNG to it then it will actually break the frames apart for you to re-export it. So you can resize it but I have seen some odd results in the past where the image keeps its transparency and you can preview it to confirm that but when it is pulled into a web page it has a white background. Strangely, you can actually just remove it by targeting the image and removing it with some CSS like .myAPNGimg{background-color:none;}
Hope that helps!
Hi Steve,
You mentioned above that…”The apng or animated png format improves on those areas, offering smaller file sizes, better colour depth, 24-bit transparency and support from all modern browsers with a static first frame fallback for those that don’t support it.” However, why is it that when I covert my Gif animation in EZGIF.com, to APNG, the file gets larger, not smaller?
I’m a bit confused about that. Can you please clarify?
Hi Ornaldo,
That would be true in most cases if you were to step back and then create Gif and APNG files from your original static frames. Once you have created a Gif, you don’t really stand to make many gains from retrospectively converting it at that point. So if you can step back and recreate it, then you should have more joy reducing its size. If size is a key factor then you may also want to think about using the WebP format.
I hope that makes sense.
Thanks,
Steve
What I’m trying to do is use an apng/png file on a site’s profile. I’ve tried using imgur, using discord, etc. but nothing at all loads. I thought maybe the site just doesn’t allow apng/png format but then I tried a random link of an animated png (https://blogs.mathworks.com/steve/files/animated-pursuit-curves.png) and it does indeed display on the site.
So my question really is, where should I upload my png so that the site is able to use it?
(I lack any knowledge regarding this so I am unable to know what makes that one link work but uploading myself on other sites doesn’t, maybe you’ll know the difference and be able to tell a solution)
Thanks.
Hi Frankie,
Basically, all digital images are made up of metadata, and some websites strip this out when you upload it to them. Your website is on WordPress and is your own, so you likely do not restrict this when uploading files. Many websites will make sure to strip out any animation data or re-save them into a flat static file at the smallest possible format and size. This is simply to keep the pages running smoothly. As you can imagine, if you had a page with multiple animated user profiles it would look quite unsightly and it would load very slowly. So it will essentially be a restriction of that website, I hope that answers the question. As you technically don’t need transparency in this image you could try it as a gif and see if that works, a gif file would be more likely to be supported.
Thanks,
Steve
Thank you for your quick response, I was able to get the job done by changing format…not to GIF though since I needed better transparency, but thanks for the idea! Not sure why I didn’t bother trying that earlier haha
For anyone having a similar issue: I tried converting it to WebP and worked perfectly on the site. (even though most animated PNGs taken from google images work too, so not as if the site just couldn’t display PNGs)
Great, I’m glad you got it working. Seems a bit odd, maybe to do with the way it was saved in the apng format.
Your site has so much useful information that I’ve been looking for. Thank you for that!
I’m working with an APNG that was converted from a GIF on ezGIF. I’m trying to use it for a FireFox theme and was wondering how you would make the left side of the image fade to transparent without editing each frame. I couldn’t find a way to make a… “gradient of transparency?” on ezGIF, and the only way I could think of doing it in photopea would be to use precision with the eraser tool on every frame. Does that make sense?
Thanks, glad you are finding it helpful. What you could do is place your image in a div and then use a pseudo-element on the div with a transparent gradient to cover the left-side of the image and set the animation with CSS to the timing of the image. The ‘transparency’ in this case would just have to be the same colour as the background, so it would only work on a solid colour unfortunately. It may be a little fiddly to get it looking right responsively but it might save you a lot of frame tweaking. Hope that helps.